
Depending on the size of sales and/or purchase orders, or just due to your company policy, prepayments may be required when dealing with orders. Business Central (BC) provides a convenient way to process prepayments against both sales and purchase orders. In this post, we’ll review how to set up and process prepayments.
Setting Up Prepayment Posting Accounts
The setup for prepayments is actually quite simple. All you really need to do is identify what accounts to use for the prepayment amount. Navigate to “General Posting Setup” to assign both the “Sales” and “Purch.” Prepayment accounts.
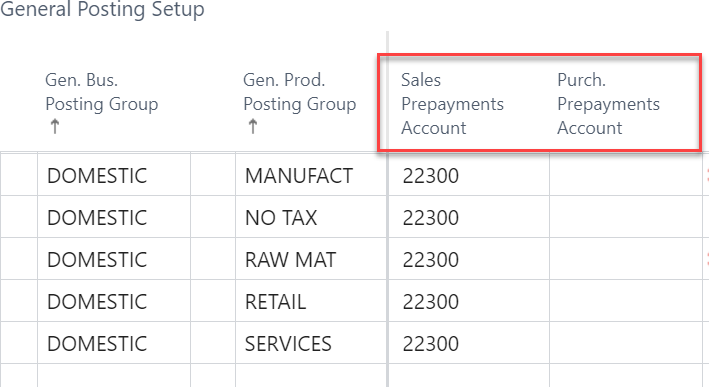
These accounts are usually balance sheet accounts. The “Sales Prepayment Account” is a customer deposit which is normally a liability account. The “Purch. Prepayment Account” is a vendor prepayment and is normally an asset account. You should check with your accounting department to determine which accounts to use. For example, when a sales prepayment is processed, the general ledger entries will be a debit to account receivable and a credit to the Sales Prepayment Account specified above.
The customer and vendor cards also include a Prepayment % field for those customers/vendors which always have prepayments. This prevents the need to manually add a prepayment percentage to the order as explained below.
Processing Prepayments
For this example, we will focus on sales prepayments, but processing purchase prepayments is identical.
Open a sales order and enter header and line details as usual. Next, head to the bottom of the page where you will find the Prepayment fasttab. There are a few fields on this fasttab, but we will focus on two. The first is the Prepayment % field. This is the field where you will enter the percentage that the customer needs to prepay. After entering the value, the system will prompt you that BC will update the lines. The second field to complete is the Prepymt. Payment Terms Code. You will have payment terms for the customer invoice, but you may have different terms for the prepayment. For example, the normal terms for the sales order may be Net 30 Days, but for the prepayment, you may want it to be due immediately or something different. BC allows you to assign different payment terms for the prepayment.
There may be times when only certain lines on the sales order require prepayment. When this is the case, you will need to expose additional columns on the sales line. The screenshot below shows the additional columns you may want to expose (see those in the red box).
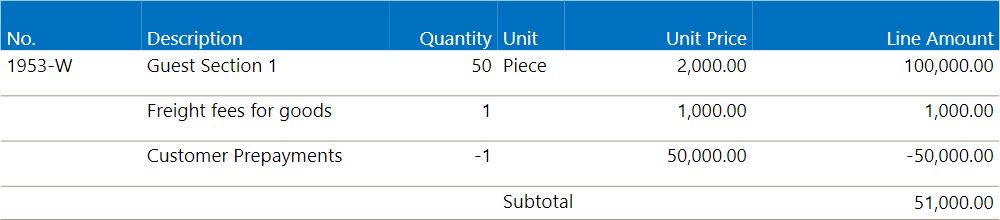
When entering the Prepayment % on the header, the system will enter that percentage on each line. But you can change the percentage for certain lines individually. As shown below, we only want the prepayment to apply to the product line and not the freight line. Clearing the percentage from the freight line accomplishes that need.

Posting Prepayments
With the prepayment percentage set, you are ready to post the prepayment invoice. You do not use the normal posting button to do this. Instead, from the sales order, click on Actions / Posting / Prepayment / Post Prepayment Invoice. Posting using this process will post the invoice and set the status on the order to Pending Prepayment. The system creates an invoice which you can now post a payment just like your normal customer payment process. If doing vendor prepayments, this process results in an invoice you can then pay as you normally would other vendor payments.
When it comes time to post the normal sales invoice, the system knows about the prepayment and will deduct it from the final invoice (see below). You don’t need to do anything else.
Notes
A couple of quick notes to be aware of:
- You cannot change the prepayment percentage on any line that has a prepayment posted against it. You can’t use this for progress payments where there is an initial payment of 50% and then a second deposit of an additional 25%. Other processes would need to be employed to do this.
- If you do need to change or remove the prepayment, you will need to post a prepayment credit memo to reverse all the prepayments. Then, you can make changes.
- Check with your state on sales tax laws. Normal BC coding will add the sales tax on the final invoice for the gross amount (before prepayment). Some states may require sales tax to be included on the prepayment invoice as well for the portion that is prepaid.
- On both the Sales C Receivables Setup and Purchases C Payables Setup there is a setting called “Check Prepmt. When Posting”. This function is a recent add to BC which forces the system to check that payment against a prepayment invoice has been paid/received before you can post the final invoice.
- Sales, Cost of Goods Sold, and Inventory are not affected by the prepayment invoice. Those entries are made when the final invoice is processed.
Summary
Using Prepayments can help keep track of customer and vendor prepayments. They also give your accounting department documents to apply those payments to. They are easy to set up and use. Try them out in your organization.
The post Customer and Vendor Prepayments in Business Central appeared first on Dynamics Communities.